This is Part 3 of the series Web Development: From Zero to Production
If you haven't read my HTML & CSS blog read it out here:-HTML, CSS.
HTML builds the page.
CSS makes it look good.
JavaScript makes it come alive.
Buttons react.
Forms validate.
Yet most beginners struggle with JavaScript.
In this guide, you’ll learn JavaScript the way web developers actually use it:
through data, control, repetition, and interaction.
This guide provides the complete foundation a web developer needs to implement real application behavior.
What JS Actually Does
JavaScript is a programming language of the web.
It can calculate, manipulate & validate data.
It can change both HTML & CSS.
It listens, decides, changes things. It talks to server.
JavaScript plays the role of behavior in web.
Behavior means:
- responding to human
- Changing UI
- managing data
- communicating with servers
If HTML is the skeleton & CSS is the skin, JavaScript is the nervous system.
JavaScript Basics
JavaScript is the language of the web.
Let’s start with some basics:-
// This is a comment - the computer ignores this text

// Printing to the console
console.log("Hello, World!");

// Basic math operations
console.log(50 + 10); // Output: 60
console.log(10 - 50); // Output: -40
console.log(5 * 5); // Output: 25
console.log(10 / 20); // Output: 0.5
The console is your teacher - it’s where you can see output from your code and can learn from your mistakes and test things out while learning.
Variables & Data Types
Programming begins with 2 abilities:
- Store information
- Execute instructions
Everything else builds on this.
Variables are containers to store the data. In JS we have different ways to declare variables and we have different types of data to store:
// Declaring variables
let name = "Luffy"; // Use let when the value may change later
const age = 19; // Use const when the value won't change
var oldWay = "not used"; // Older way of declaring variables (avoided now)

// Basic Data Types
const myString = "Hello"; // Text (string)
const myNumber = 42; // Number
const isAwesome = true; // Boolean (true/false)
const nothing = null; // Explicitly nothing
const notDefined = undefined; // Value not assigned
const myArray = [1, 2, 3]; // Array (collection of values)
const myObject = { name: "Book" }; // Object (collection of key-value pairs)
Always use const when possible, and let when you need to change the value later. This makes your code more predictable!
Operators
Operators are used in making decisions with data & the tools to work with data.
They help us:
- Assign values
- Perform calculations
- compare results
- build logic
Without operators, variables would just sit there doing nothing.
Think of them as the verbs of programming.
We have different types in Operators:-
- Assignment Operator: These store values inside variables.
let score = 10;
The = does not mean “equal”.
It means → put the value on the right into the variable on the left.
Short Assignment
A very common professional pattern.
score = score + 10;
can be written as:
score += 10;
Other versions are:-
score -= 5; // subtract
score *= 2; // multiply
score /= 3; // divide
score %= 2; // remainder
Arithmetic Operator:-
Used to perform mathematical operations.
- Addition (
+) – Adds values together.
- Subtraction (
-) – Finds the difference between values.
- Multiplication (
*) – Multiplies values.
- Division (
/) – Divides one value by another.
- Modulus (
%) – Gives the remainder after division.
- **Exponentiation (
**)** – Raises a value to a power.
- Increment (
++) – Increases a value by one.
- Decrement (
-) – Decreases a value by one.
Comparison Operators:-
Used to compare 2 or more values together:-
- Equal to (
==) – Checks if values are equal after type conversion.
- Not equal to (
!=) – Checks if values are different after type conversion.
- Equal value & equal type (
===) – Checks if values and their types are exactly the same.
- Not equal value & not equal type (
!==) – Checks if value or type is different.
- Greater than (
>) – True if the left value is bigger than the right.
- Greater than or equal to (
>=) – True if the left value is bigger than or equal to the right.
- Less than (
<) – True if the left value is smaller than the right.
- Less than or equal to (
<=) – True if the left value is smaller than or equal to the right.
console.log(5 == "5"); // true
console.log(5 != "5"); // false
console.log(5 === "5"); // fals
console.log(5 !== "5"); // true
console.log(10 > 5); // true
console.log(10 >= 10); // true
console.log(3 < 5); // true
console.log(5 <= 5); // true
Functions
Functions are reusable block of code. Think of them sub-tasks to complete major task.
// Basic function declaration
function greetings(name) {
  return "Hello, " + name + "!";
}

// Using the function
console.log(greetings("Alex")); // Output: "Hello, Alex!"

// Function that adds two numbers
function add(a, b) {
  return a + b;
}

const sum = add(5, 3);
console.log(sum); // Output: 8
Functions help avoid repeating code and make your program more organized. They can take inputs (parameters) and give back outputs (return values).
Arrow Functions
Arrow functions are a newer, shorter way to define functions. They’re especially useful for short & simple operations:
// Regular function
function double(num) {
  return num * 2;
}

// The same function as an arrow function
const doubleArrow = (num) => num * 2;

console.log(double(4)); // Output: 8
console.log(doubleArrow(4)); // Output: 8

// Multiple parameters need parentheses
const add = (a, b) => a + b;
console.log(add(3, 5)); // Output: 8

// For multiple lines, use curly braces and 'return'
const greet = (name) => {
  const message = "Hello, " + name + "!";
  return message;
};
Arrow functions are not just shorter - they also handle the this keyword differently, which becomes important when you start working with objects and events.
Scope
Scope determines the accessibility of the variables. JS has 3 types of scope.
// global scope
const x = 1;

console.log(x); // can acces anywhere

// Function scope
const greetings = () => {
  let name = "Luffy";
  return "Yo " + name; // can only access inside a function
};

// block scope
{
  let y = 10; // only accessible inside this block
}
// can't access here
Scopes tells where a variable is accessible and where it isn’t.
Arrays, Objects
Arrays & Objects are 2 ways to organize multiple data in a variable in JavaScript.
Arrays
Arrays are ordered collections of values. Whose index starts from 0.
// Creating an array
const fruits = ["apple", "banana", "orange"];

// Accessing items (starting from zero)
console.log(fruits[0]); // Output: "apple"
console.log(fruits[1]); // Output: "banana"

// Adding to the end of an array
fruits.push("mango");
console.log(fruits); // Output: ["apple", "banana", "orange", "mango"]

// Common array methods
const numbers = [1, 2, 3, 4, 5];

// map - transforms each item
const doubled = numbers.map((num) => num * 2);
console.log(doubled); // Output: [2, 4, 6, 8, 10]

// filter - keeps only items that pass a test
const evenNumbers = numbers.filter((num) => num % 2 === 0);
console.log(evenNumbers); // Output: [2, 4]
Objects
Objects store data in key-value pairs.
// Creating an object
const person = {
  firstName: "Emma",
  lastName: "Watson",
  age: 35,
  city: "Berlin",
  hobbies: ["reading", "hiking"],
};

// Accessing properties
console.log(person.firstName); // Output: "Emma"
console.log(person["age"]); // Output: 35 (alternative way)

// Adding or changing properties
person.job = "Developer";
person.city = "New York";

console.log(person);
// Output: {firstName: "Emma", lastName: "Watson", age: 29, city: "New York", hobbies: ["reading", "hiking"], job: "Developer"}
Objects are everywhere in JS. They're used for storing related data and creating more complex data structures.
Control Flow Statements
Control Flow statements are conditional logics.
Conditional logics let your code make decisions.
const age = 20;

// Basic if statement
if (age >= 18) {
  console.log("Eligible to vote");
} else {
  console.log("Not eligible to vote");
}

// Multiple conditions
const score = 85;

if (score >= 90) {
  console.log("Grade: A");
} else if (score >= 80) {
  console.log("Grade: B");
} else if (score >= 70) {
  console.log("Grade: C");
} else {
  console.log("Grade: F");
}

// Logical operators
const isLoggedIn = true;
const isAdmin = true;

if (isLoggedIn && isAdmin) {
  console.log("Welcome Admin!");
}

const isMember = false;
const hasFreeTrial = true;

if (isMember || hasFreeTrial) {
  console.log("You can access this content");
}
Logical Operators
- And (&&) - Returns true if both expressions are true
- OR(||) - Returns true if any one the expressions are true
- NOT (!) - Returns true if false and false if true.
Loops
Loops are used to repeat the same process again and again until the condition satisfies. Once condition is false the loop stops.
// while loop - pre-tested loop
let i = 0;
while(i <= 10) {
	console.log(i); // 0, 1, 2, 3, 4, 5, 6, 7, 8, 9, 10
	i++;
}

// do-while loop - post-tested loop
let i = 1;
do {
	console.log(i); // 1, 2, 3, 4, 5, 6, 7, 8, 9, 10
	i++;
}while(i <= 10);

// for loop - iterative loop
for(let i = 0;i < 5; i++) {
	console.log(i);  // 0, 1, 2, 3, 4
}

// forEach loop - traverse through arrays
const arr = [1, 2, 3, 4, 5]
arr.forEach((item) => {
	console.log(item);
})

// for-in loop - traverse through objects
const person = { firstName: "Luffy" , age: 30 };
for(const key in person) {
	console.log(key + ":" + person[key}); //  "firstName: John", "age: 30"
}

// for-of loop - traverse through arrays
const cars = ["BMW", "Volvo", "Dodge Challenger"];
for (const car of cars) {
  console.log(car);
  // "BMW", "Volvo", "Dodge Challeneger"
}
Ternary Operator
The ternary operator is a shorter way (shorthand) of writing if/else statements.
const age = 20;

// Traditional if/else
let message;
if (age >= 18) {
  message = "You can vote!";
} else {
  message = "Too young to vote.";
}

// Same thing using ternary operator
const message = age >= 18 ? "You can vote!" : "Too young to vote.";

console.log(message); // Output: "You can vote!"

// Useful in React and other frameworks
const userType = "admin";
const greeting =
  userType === "admin" ? "Welcome, Administrator" : "Welcome, User";

console.log(greeting); // Output: "Welcome, Administrator"
Destructuring
Destructuring is a coinvent way to extract values from arrays or objects.
Array Destructuring
const colors = ["red", "green", "blue"];

// Without destructuring
const firstColor = colors[0];
const secondColor = colors[1];

// With destructuring
const [first, second, third] = colors;

console.log(first); // Output: "red"
console.log(second); // Output: "green"
console.log(third); // Output: "blue"

// Skipping elements
const numbers = [1, 2, 3, 4, 5];
const [one, , three, ...rest] = numbers;

console.log(one); // Output: 1
console.log(three); // Output: 3
console.log(rest); // Output: [4, 5]
Object Destructuring
const user = {
  name: "Alex",
  age: 32,
  location: "Tokyo",
};

// Without destructuring
const userName = user.name;
const userAge = user.age;

// With destructuring
const { name, age, location } = user;

console.log(name); // Output: "Alex"
console.log(age); // Output: 32
console.log(location); // Output: "Tokyo"

// Using different variable names
const { name: fullName, age: years } = user;
console.log(fullName); // Output: "Alex"
console.log(years); // Output: 32

// Default values
const { name, country = "Unknown" } = user;
console.log(country); // Output: "Unknown" (since it doesn't exist in the object)
Destructuring makes your code cleaner and more readable, especially when working with complex data.
Template Literals
Template literals are a better way to work with string in JS. It’s a easier way of writing variables and text together.
const name = "Luffy";
const age = 30;

// Old way of combining strings
const greeting1 =
  "Hello, my name is " + name + " and I am " + age + " years old.";

// Using template literals
const greeting2 = `Hello, my name is ${name} and I am ${age} years old.`;

console.log(greeting2);
// Output: "Hello, my name is Luffy and I am 30 years old."

// You can also do calculations inside ${}
const price = 19.99;
const tax = 1.2;
const total = `The total is $${(price * tax).toFixed(2)}`;

console.log(total);
// Output: "The total is $23.99"

// Multi-line strings are easy with template literals
const message = `This is line one.
This is line two.
This is line three.`;

console.log(message);
// Output:
// This is line one.
// This is line two.
// This is line three.
Template literals make string formatting much easier and more readable than the old way of concatenating strings with +.
Rest/Spread Operator
The ... operator is one the most versatile features in modern JS.
Rest Operator
The rest operator collects multiple elements into single array:
// Rest in function parameters
function sum(...numbers) {
  return numbers.reduce((total, num) => total + num, 0);
}

console.log(sum(1, 2)); // Output: 3
console.log(sum(1, 2, 3, 4)); // Output: 10

// Rest in array destructuring
const [first, second, ...others] = [1, 2, 3, 4, 5];

console.log(first); // Output: 1
console.log(second); // Output: 2
console.log(others); // Output: [3, 4, 5]

// Rest in object destructuring
const person = { name: "Alex", age: 25, city: "Paris", job: "Developer" };
const { name, age, ...otherDetails } = person;

console.log(name); // Output: "Alex"
console.log(otherDetails); // Output: { city: "Paris", job: "Developer" }
Spread Operator
The spread operator expands array or object elements:
// Spreading arrays
const numbers1 = [1, 2, 3];
const numbers2 = [4, 5, 6];
const combined = [...numbers1, ...numbers2];

console.log(combined); // Output: [1, 2, 3, 4, 5, 6]

// Copying arrays (without reference)
const original = [1, 2, 3];
const copy = [...original];
copy.push(4);

console.log(original); // Output: [1, 2, 3] (unchanged)
console.log(copy); // Output: [1, 2, 3, 4]

// Spreading objects
const defaults = { theme: "light", fontSize: 12, cache: true };
const userPrefs = { theme: "dark", notifications: false };

const settings = { ...defaults, ...userPrefs };

console.log(settings);
// Output: { theme: "dark", fontSize: 12, cache: true, notifications: false }
The spread operator is especially useful in React when you need to create new arrays or objects without modifying the originals.
Optional Chaining
Optional Chaining helps prevent errors when accessing nested properties that might not exist:
const user = {
  name: "Alex",
  details: {
    age: 30,
    preferences: {
      theme: "dark",
    },
  },
};

// Without optional chaining (error-prone)
// If user.details or user.details.preferences is undefined,
// this will throw an error
// const theme = user.details.preferences.theme;

// With optional chaining (safe)
const theme = user?.details?.preferences?.theme;
console.log(theme); // Output: "dark"

// If a property doesn't exist
const country = user?.details?.location?.country;
console.log(country); // Output: undefined (no error!)

// With arrays
const users = [{ name: "Alex", role: "admin" }, { name: "Sarah" }];

console.log(users[0]?.role); // Output: "admin"
console.log(users[1]?.role); // Output: undefined (no error)

// With function calls
const getData = () => ({ value: 42 });
// const noData = undefined;

console.log(getData?.().value); // Output: 42
// console.log(noData?.().value); // Output: undefined (no error)
Optional chaining (introduced in ES2020) helps make your code more resilient and avoids many common errors when working with complex data structures.
DOM
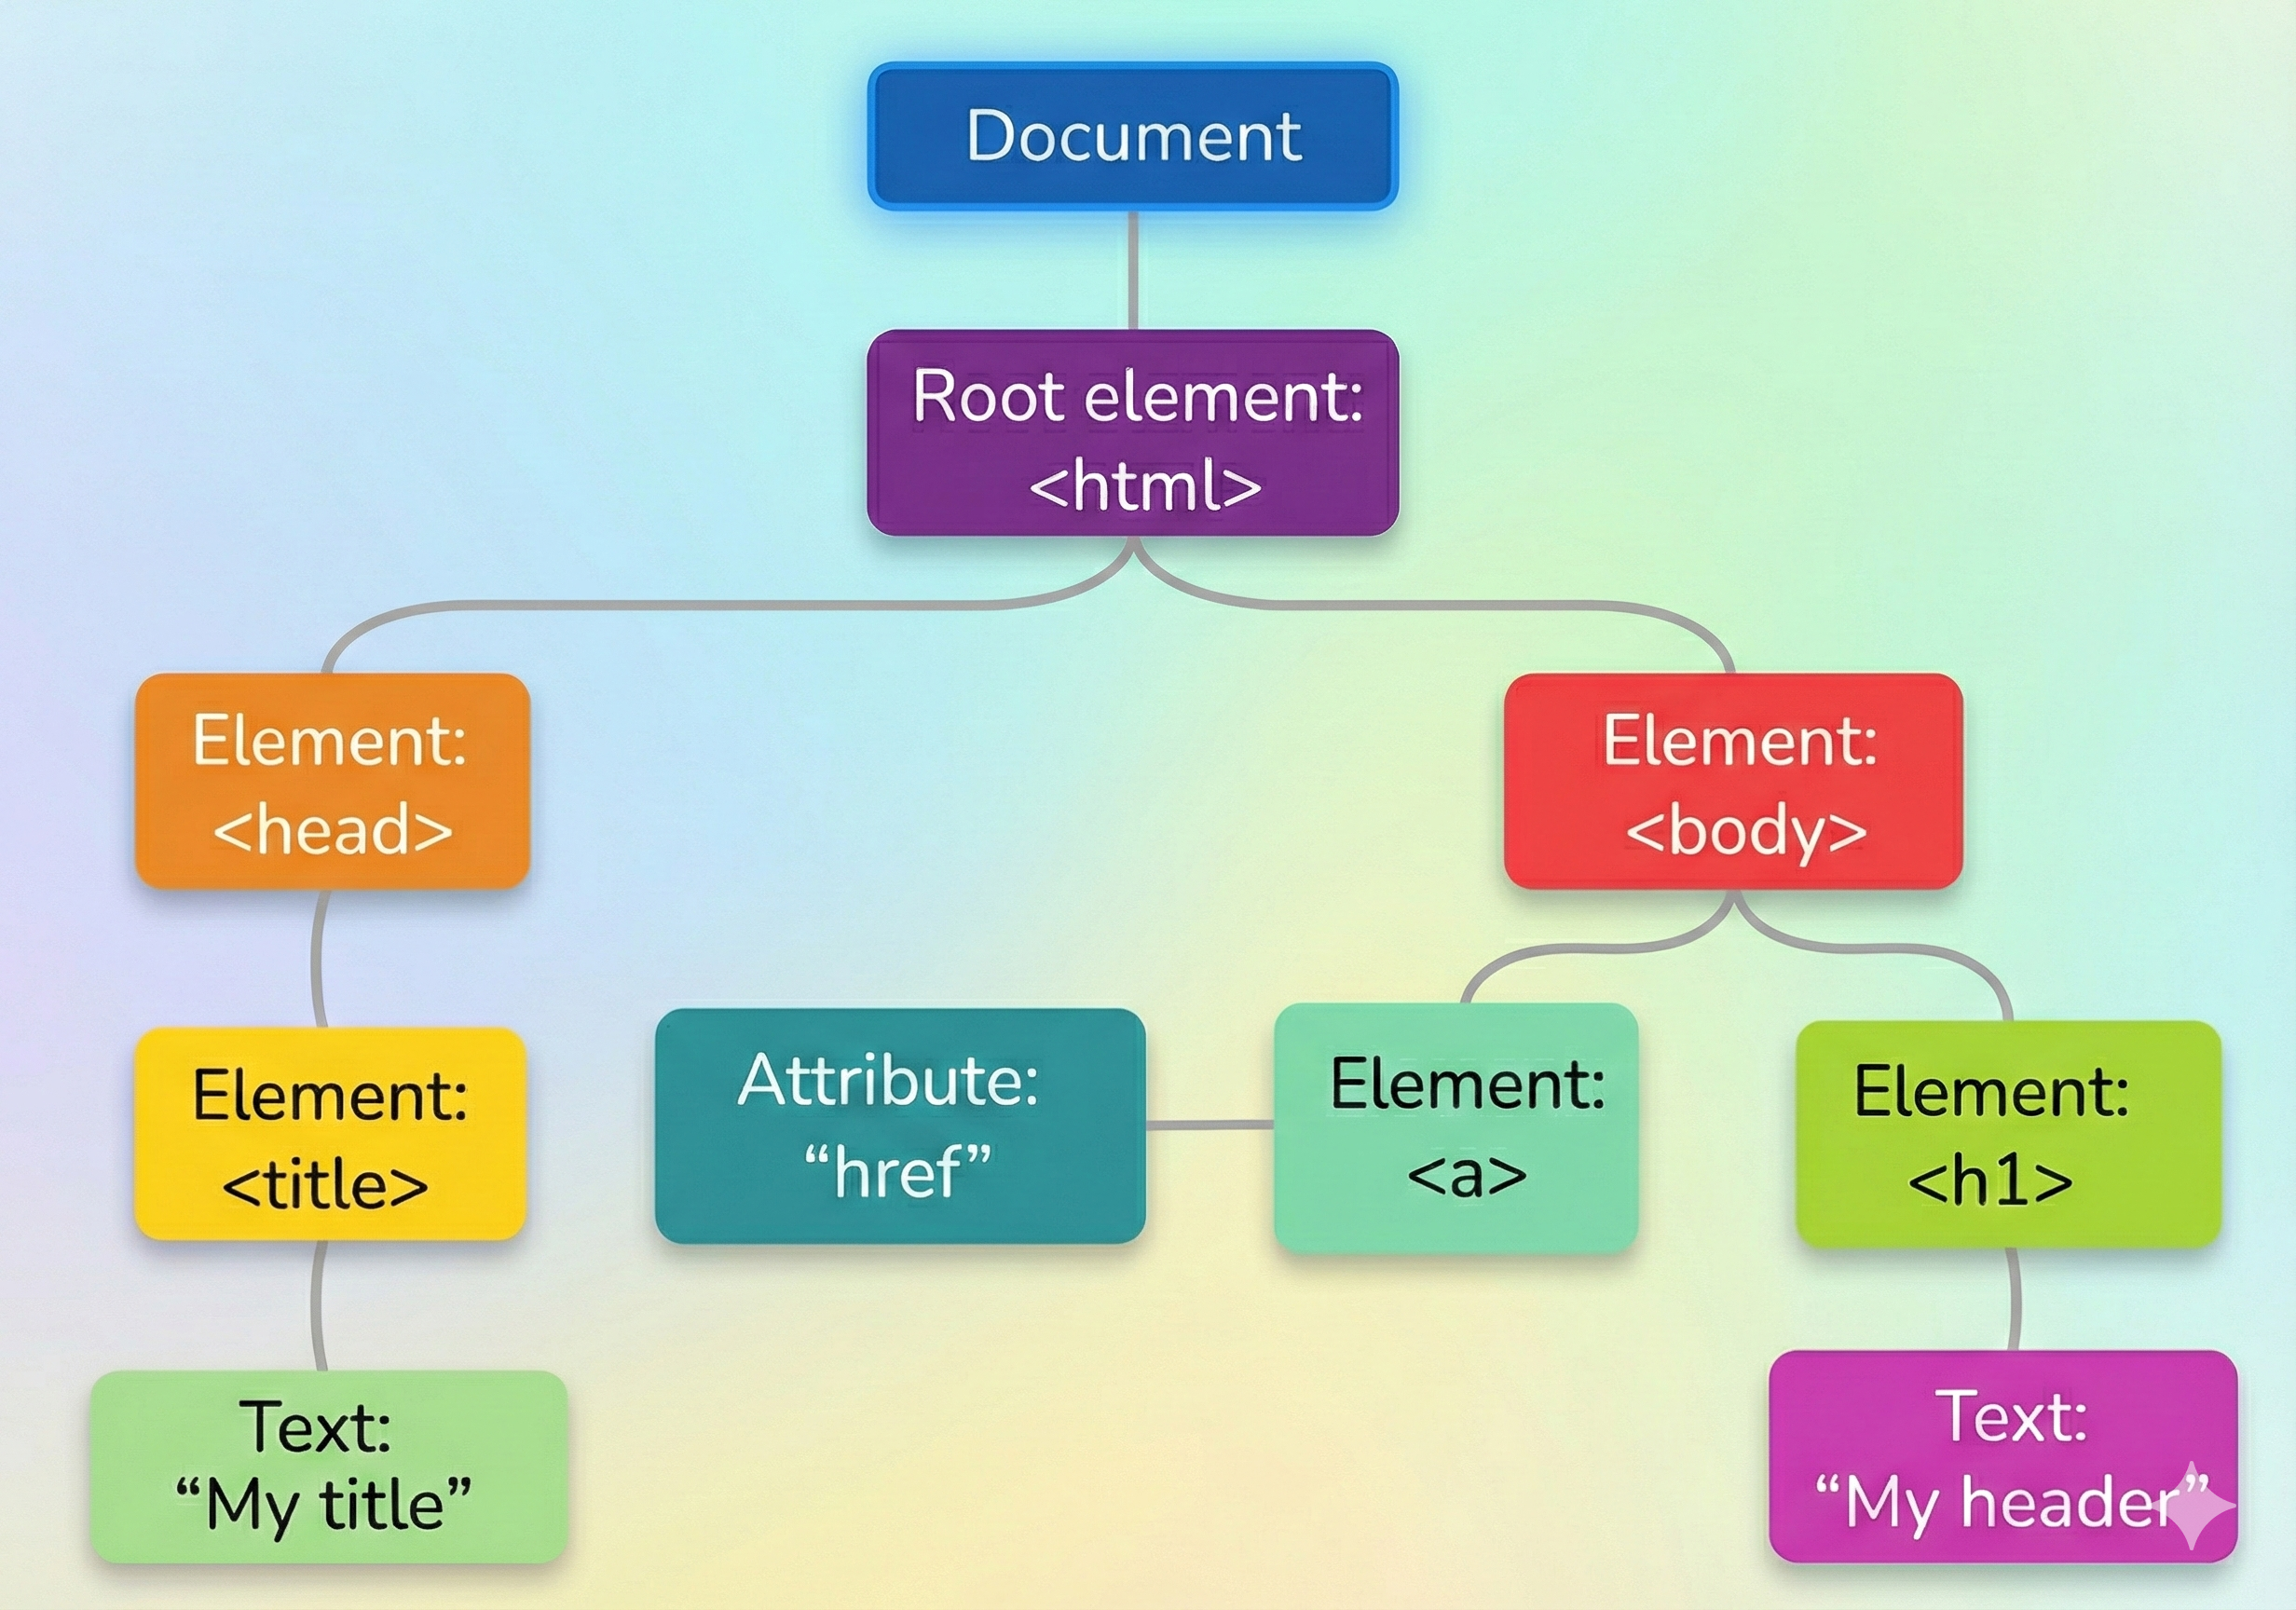
When the browser loads a page, it converts HTML into a tree of objects.
This structure is called the DOM (Document Object Model).
JavaScript can use the DOM to:
- find elements
- read information
- change content
- update styles
- react to user actions
If JavaScript is the brain, the DOM is the body it controls.
What the DOM Looks Like
Every tag becomes a node that JavaScript can talk to.
Accessing HTML Elements
Before changing anything, we must select it.
Think:
find → store → manipulate
Common Selection Methods
getElementById()
Returns one element because IDs are unique.
querySelector()
Returns the first match using CSS selector rules.
getElementsByClassName()
Returns a live collection of elements.
getElementsByTagName()
Returns elements by tag.
Full Working Example (with all content methods)
<html>
  <body>
    <h1 id="title">Original Title</h1>
    <p class="para">Paragraph 1</p>
    <p class="para">Paragraph 2</p>

    <script>
      // SELECTING ELEMENTS

      // By ID (single element)
      const title = document.getElementById("title");

      // First match using CSS selector
      const firstPara = document.querySelector(".para");

      // Collection by class name
      const allParas = document.getElementsByClassName("para");

      // Collection by tag
      const headings = document.getElementsByTagName("h1");

      // CHANGING CONTENT

      // 1) textContent → changes only text
      title.textContent = "Updated with textContent";

      // 2) innerText → similar to textContent but respects styling/visibility
      firstPara.innerText = "Updated with innerText";

      // 3) innerHTML → can insert HTML tags
      allParas[1].innerHTML = "<strong>Updated with innerHTML</strong>";

      // READING CONTENT

      console.log(title.textContent);
      console.log(firstPara.innerText);
      console.log(allParas[1].innerHTML);
    </script>
  </body>
</html>
Understanding the Differences (VERY IMPORTANT)
textContent
Gets/sets raw text.
Fast. Safe. Preferred most of the time.
innerText
Considers CSS.
If something is hidden, it may not return it.
Used less frequently.
innerHTML
Reads or writes HTML markup.
Powerful but risky if content comes from users (can create security issues).
Use carefully.
Single vs Multiple Elements
Some methods give:
one element
Others give a list
Example:
const paras = document.getElementsByClassName("para");
You must pick:
paras[0];
paras[1];
Forgetting this is a classic beginner bug.
Professional Tip
Modern development mostly prefers:
document.querySelector();
document.querySelectorAll();
Because they are flexible and work like CSS.
Events
An event is something that happens in a browser.
Example:-
- Button gets clicked
- Text is typed
- Form is submitted
- Mouse moves
- Key is pressed
JS can listen to these actions and run code in response.
The Flow
User does something → event fires → handler runs → UI updates.
<!-- Example 1: Click Event -->

<button id="btn">Click Me</button>
<script>
  const btn = document.getElementById("btn");
  btn.addEventListener("click", () => {
    console.log("Button Clicked!");
  });
</script>

<!-- Example 2: Change Text on Click -->
<h1 id="title">Hello</h1>
<button id="btn">Change</button>

<script>
  const title = document.getElementById("title");
  const btn = document.getElementById("btn");

  btn.addEventListener("click", () => {
    title.textContent = "Title Updated!";
  });
</script>

<!-- Example 3: Input Event (Typing) -->
<input id="name" placeholder="Type your name" />
<p id="output"></p>

<script>
  const input = document.getElementById("name");
  const output = document.getElementById("output");

  input.addEventListener("input", () => {
    output.textContent = input.value;
  });
</script>

<!-- Example 4: Submit Event (Forms) -->
<form id="form">
  <input />
  <button>Submit</button>
</form>

<script>
  const form = document.getElementById("form");

  form.addEventListener("submit", (e) => {
    e.preventDefault(); // stop page reload
    console.log("Form submitted");
  });
</script>
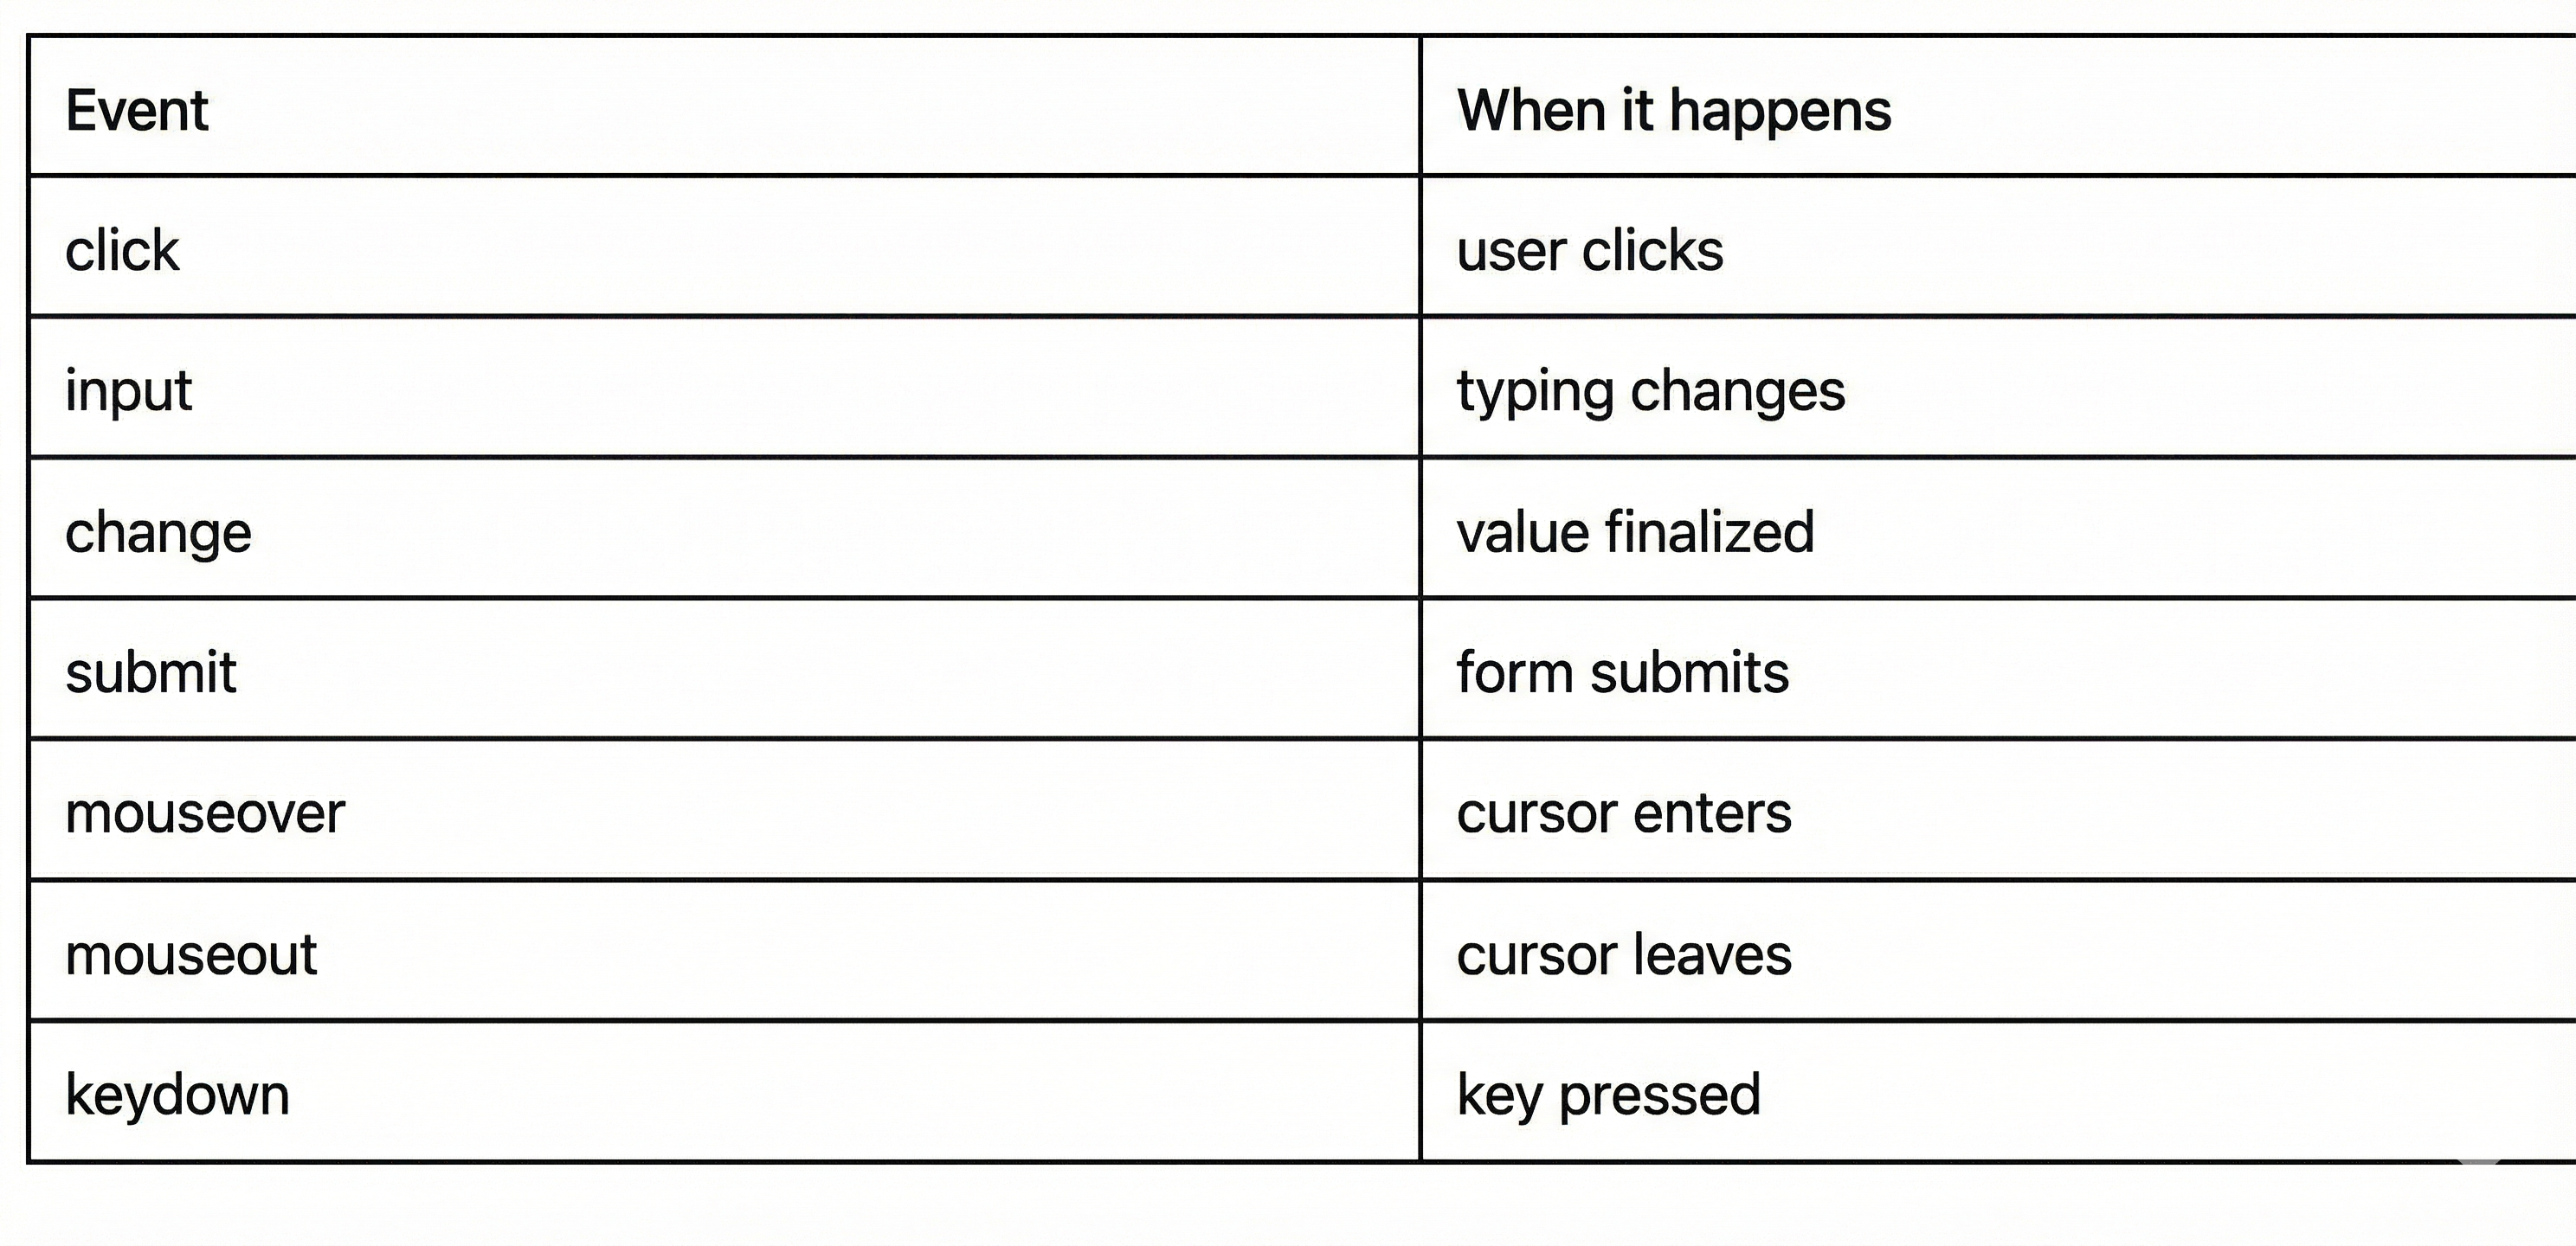
Common Event types you must know
Passing the Event Object
Sometimes you need details. You can get that from this.
btn.addEventListener("click", (event) => {
  console.log(event.target);
});
You can know:
- Which element triggered
- Mouse position
- Pressed Key
Exception Handling
Errors can happens t any time — network failures, wrong data, unexpected input.
Exception handling prevents the application from crashing and allows us to respond gracefully.
try..catch
We place risky code inside try
If something fails, controls moves to catch
try {
  riskyOperation();
} catch (error) {
  console.log("Something went wrong");
}
Promises, Async & Await
Asynchronous coding allows time-consuming tasks to run without stopping the rest of the program.
Things like:
- API requests
- timers
- file uploads
- authentication
take time to complete.
JavaScript continues executing other code and handles the result when it arrives.
async
Placed before a function to indicate it will handle asynchronous work.
An async function always returns a Promise.
await
Used inside an async function.
It pauses that function until the promise resolves and gives back the final value.
This makes async code look simple and step-by-step.
The Core Problem
Look at this:
const data = fetch("/api/user");
console.log(data);
You won’t get the user. You get a promise that the data will arrive. Because fetching takes time.
What is Promise?
A Promise is an object that represents a future result.
It can be:-
- pending → still working
- fulfilled → success
- rejected → failed
Think of ordering food. You receive a token, not the dish immediately.
Creating a Promise
const promise = new Promise((resolve, reject) => {
  const success = true;

  if (success) {
    resolve("Done");
  } else {
    reject("Failed");
  }
});
You rarely create them manually in UI work, but knowing the structure matters.
Consuming Promises with .then()
Before async/await existed, this was the main way.
fetch("/api/user")
  .then((res) => res.json())
  .then((data) => {
    console.log(data);
  })
  .catch((err) => {
    console.error(err);
  });
It works. But chains grow. Readability drops. (Not preferred)
Async/Await — Modern JS
This lets asynchronous code look synchronous.
// Basic structure
async function loadUser() {
  const res = await fetch("/api/user");
  const data = await res.json();
  console.log(data);
}
await pauses inside the function, not the whole program. Other things can still run.
Error Handling
Networks fail. Servers crash. User lose internet.
We must plan for failure.
async function loadUser() {
  try {
    const res = await fetch("/api/user");
    const data = await res.json();
    console.log(data);
  } catch (error) {
    console.log("Something went wrong");
  }
}
Mini Project — Show / Hide Password Toggle
You’ve seen this in login pages everywhere.
User clicks an icon → password becomes visible.
Click again → hidden.
Simple interaction.
Excellent fundamentals.
<!DOCTYPE html>
<html lang="en">
<head>
    <meta charset="UTF-8">
    <meta name="viewport" content="width=device-width, initial-scale=1.0">
    <title>Login Form with Toggle Password</title>
    <style>
        /* Basic Reset to make styling easier */
        * {
            box-sizing: border-box;
            margin: 0;
            padding: 0;
        }

        body {
            font-family: 'Segoe UI', Tahoma, Geneva, Verdana, sans-serif;
            background-color: #f0f2f5;
            display: flex;
            justify-content: center;
            align-items: center;
            height: 100vh;
        }

        /* The main card container for the form */
        .login-container {
            background-color: #ffffff;
            padding: 2.5rem;
            border-radius: 12px;
            box-shadow: 0 8px 24px rgba(0, 0, 0, 0.1);
            width: 100%;
            max-width: 400px; /* Ensures it doesn't get too wide on large screens */
        }

        h2 {
            text-align: center;
            margin-bottom: 1.5rem;
            color: #333;
        }

        /* Styling for the input groups */
        .input-group {
            margin-bottom: 1.25rem;
        }

        .input-group label {
            display: block;
            margin-bottom: 0.5rem;
            font-weight: 600;
            color: #555;
        }

        .input-group input {
            width: 100%;
            padding: 0.75rem;
            border: 1px solid #ddd;
            border-radius: 6px;
            font-size: 1rem;
            transition: border-color 0.3s;
        }

        /* Highlight inputs when focused */
        .input-group input:focus {
            outline: none;
            border-color: #007bff;
        }

        /* --- Password Toggle Specific Styles --- */

        /* We need `position: relative` here so the icon can be positioned absolutely within it */
        .password-wrapper {
            position: relative;
            width: 100%;
        }

        /* Styling the eye icon */
        .toggle-password-icon {
            position: absolute;
            right: 15px;
            /* Center vertically inside the input */
            top: 50%;
            transform: translateY(-50%);
            cursor: pointer;
            color: #888;
            font-size: 1.2rem;
            user-select: none; /* Prevents highlighting the emoji icon */
        }

        .toggle-password-icon:hover {
            color: #333;
        }

        /* --- Button Styles --- */
        .login-button {
            width: 100%;
            padding: 0.75rem;
            border: none;
            border-radius: 6px;
            background-color: #007bff;
            color: white;
            font-size: 1.1rem;
            font-weight: bold;
            cursor: pointer;
            transition: background-color 0.3s;
        }

        .login-button:hover {
            background-color: #0056b3;
        }
    </style>
</head>
<body>

    <div class="login-container">
        <h2>Login</h2>
        <form action="#" method="post">

            <div class="input-group">
                <label for="username">Username</label>
                <input type="text" id="username" name="username" required>
            </div>

            <div class="input-group">
                <label for="password">Password</label>
                <div class="password-wrapper">
                    <input type="password" id="password" name="password" required>
                    <span id="togglePassword" class="toggle-password-icon" title="Show Password">👁️</span>
                </div>
            </div>

            <button type="submit" class="login-button">Login</button>
        </form>
    </div>

    <script>
        // 1. Select the necessary elements from the DOM
        const passwordInput = document.getElementById('password');
        const toggleIcon = document.getElementById('togglePassword');

        // 2. Add a click event listener to the eye icon
        toggleIcon.addEventListener('click', function () {

            // Check the current type attribute of the password field
            const currentType = passwordInput.getAttribute('type');

            if (currentType === 'password') {
                // Switch to text to show password
                passwordInput.setAttribute('type', 'text');

                // Change the icon to a "crossed out eye" (or equivalent) to indicate hiding
                this.textContent = '🙈';
                this.setAttribute('title', 'Hide Password');
            } else {
                // Switch back to password to hide it
                passwordInput.setAttribute('type', 'password');

                // Change the icon back to the normal eye
                this.textContent = '👁️';
                this.setAttribute('title', 'Show Password');
            }
        });
    </script>

</body>
</html>
Skills You’ll Strengthen
- selecting inputs
- click handling
- reading & changing attributes
- toggling state
- updating UI
Projects to be made to polish your skill
- Toggle Dark/Light Mode
- Character Count
- FAQ Accordion
- Image Preview
- Todo List
- Live Search Filter
- Form Validation System
Common Beginner Mistakes
- Memorizing syntax without understanding logic
- Copying code and assuming learning happened
- Ignoring error messages
- Writing everything in one big block
- Jumping to frameworks too early
If you can’t explain what your code is doing, you don’t truly own it.
How to Practice Correctly
- Change values and predict outcomes
- Break things on purpose
- Read errors carefully
- Use the console to inspect behavior
- Rebuild small features multiple times
Progress comes from debugging, not watching.
What comes Next?
You can now build real interactions.
You know how to react to user input, update the UI, and control behavior with logic. That’s huge.
But as projects grow, JavaScript can become harder to manage. Small mistakes turn into big bugs.
In the next part of this series, we’ll level up with TypeScript — a tool that helps you write safer, clearer, and more scalable code.
You’re not replacing JavaScript.
You’re strengthening it.
Next: Writing Safer JavaScript with TypeScript.
Happy coding 🚀